First completed: December 2018
In this relatively simple project, I show how old equipment can be retrofitted with a remote control function by adding a small microcontroller. I will add an infrared remote control to a Yamaha K-220 microcomputer-controlled tape deck, but the principle could be applied to any remote control technology (e.g. Wi-Fi or Ethernet) to any device with logic (non-mechanical) controls.

The main steps are to determine how the device to be modified is controlled and work out how this can be interfaced with a microcontroller, and in the case of an infrared remote control, work out how the remote can be interfaced with the microcontroller as well.
Equipment interface
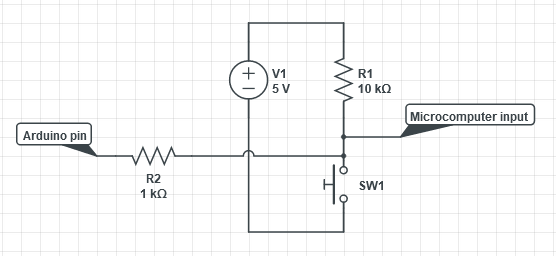
The "microcomputer" is an LM6416E 4-bit N-channel MOS microcontroller. Each button on the front panel is connected between GND and an input pin and there is a pull-up resistor connecting the pin to +5V.

The input pin normally resides at 5V, and is pulled down to GND when the button is pressed. Our own controller (e.g. Arduino) must simulate these button presses whilst allowing normal control via the front panel when desired. This is achieved by using a tristate output which is normally high-impedance and driven low when the remote control command is received. After adding a 1k resistor in series (not strictly necessary and just for protection in case a software bug allows the Arduino output to be driven high), the circuit for each pin looks like this:
And the function to control the pins looks like this:
void pulsePin(uint_fast8_t pin) {
  if (pin != pin_invalid) {
    pinMode(pin, OUTPUT);
    delay(pin_mark_time);
    pinMode(pin, INPUT);
  }
}
The pin is driven low for pin_mark_time then tristated. The value of pin_mark_time (in milliseconds) can be found by experimentation. In this case, 100ms worked fine.
The Arduino microcontroller can now control the tape deck, but the remote control still needs to be added.
Infrared remote interface
For the remote control, six redundant buttons on the hi-fi amplifier remote (originally for a CD player which I don't have) which roughly correspond to the six buttons on the cassette deck shall be used.

A standard 38kHz IR remote control receiver module is hooked up to an oscilloscope and the waveform is examined to determine the protocol. In the image below, the "Play" button is pressed. The waveform is compared to the example waveforms for various popular remote control protocols that are available online.

The protocol turns out to be the very popular RC-5 protocol and five of the six buttons correspond to the standard RC-5 commands for CD players:
- Reverse: 33
- Forward: 32
- Stop: 54
- Play: 53
- Pause: 40
- Sound Mode: 130
The popularity of the Arduino system means an open-source library is available for almost any IR protocol, so a simple RC-5 library is selected for this project. The library is licensed under the permissive 2-clause BSD license. The included code example which prints received codes via the UART confirms the command codes listed above, so all that's left is to pulse the output pins when the appropriate code is received.
In addition to the command code, the RC-5 packet also includes an address, which the library decodes as well. The address allows multiple devices of different types to use the RC-5 protocol without interference. Unsurprisingly, it's the standard CD player address (system 20).
Putting it all together
The full code for the Arduino-based IR cassette deck controller is on my GitHub along with some comments which explain how the code works.
All that remains is to transfer the design to some permanent hardware. I chose to build the final version of the design directly on stripboard instead of using an Arduino plus a shield to make the solution more compact and make it easier to integrate it into the equipment.
An ATmega328p with the Arduino bootloader is used. It could be ported to a smaller microcontroller to make it even more compact, but I didn't perceive the effort as being worth it for this one-off case, so I stuck with the ATmega328p. The necessary components are soldered to the stripboard along with wires to connect it to the "microcomputer PCB" of the cassette deck. The buttons all share a single connector, so the soldering is neat and tidy here. Power is also taken from the microcomputer PCB. The stripboard assembly is mounted on a convenient ledge using hot glue.


Finally, the infrared sensor needs to be placed somewhere. As the cassette deck was not originally designed for a remote control, there is no official place on the front panel for it, but through careful positioning, it is possible to install it without needing to cut any holes without significantly compromising the IR sensitivity.
The IR sensor is installed behind this knob. Whilst refitting the knob does affect the sensitivity somewhat, the sensitivity is still good.


No comments:
Post a Comment